Camellias are cherished garden beauties renowned for their glossy, evergreen leaves and stunning blooms, which brighten the landscape in winter and early spring. However, these elegant shrubs are not immune to plant diseases. One of the most common and frustrating issues gardeners encounter is the appearance of black spots on camellia leaves. These dark blemishes not only spoil the plant’s beauty but can also signal underlying fungal or environmental problems that, if ignored, may weaken the plant over time.
camellia black spots on leaves what causes these black spots and learning how to properly care for them is essential to maintaining and preserving the health and vitality of your camellias. In this guide, we’ll explore the common causes, step-by-step treatments, natural remedies, and preventive care tips to help you restore your camellia’s lush green foliage and keep it thriving throughout the year.
Understanding Black Spots on Camellia Leaves
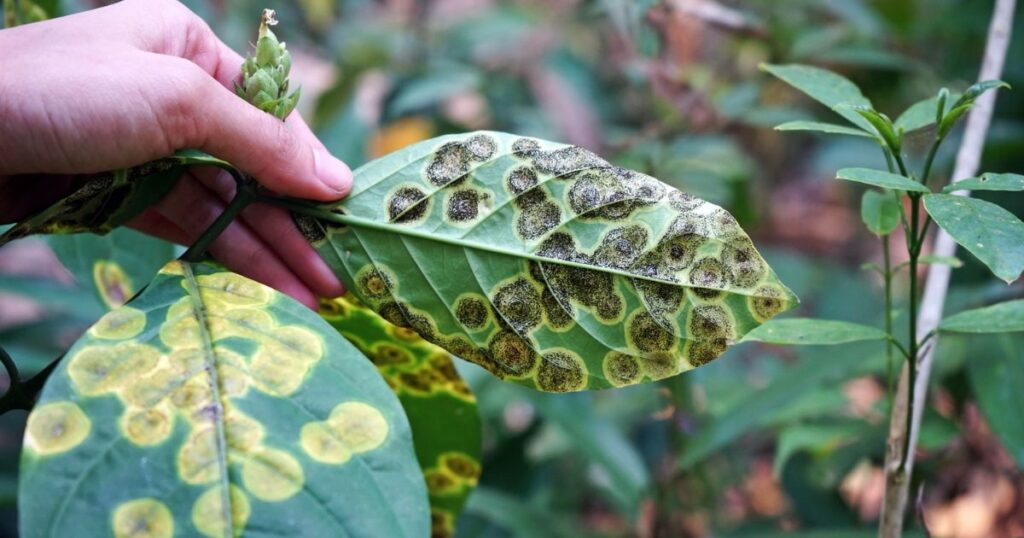
Black spots on camellia leaves are more than just a cosmetic problem; they’re often an early warning sign that your plant is under stress or suffering from disease. These spots typically appear as small, dark patches that may enlarge over time, causing leaves to yellow, curl, or drop prematurely. To treat the issue effectively, it’s essential to understand what’s really happening beneath the surface.In most cases, black spots on camellia leaves are caused by fungal infections such as Camellia Leaf Spot (Pseudocercospora species) or sooty mold, which develops on the sticky residue (honeydew) left behind by pests like aphids, scales, or whiteflies. Occasionally, bacterial infections or nutrient deficiencies can also contribute to discoloration.
Environmental factors also play a role; poor air circulation, high humidity, overwatering, or prolonged shade create ideal conditions for fungi to thrive. When these issues combine, What is Damping Off Disease and How to Protect Your Seedlings your camellia’s natural defenses weaken, allowing disease to spread more easily.By correctly identifying the cause, whether it’s a fungal infection, pest infestation, or environmental stress, you can prevent long-term harm by selecting the most effective course of action. Damage to your camellia plant.
Common Causes of Black Spots on Camellia Leaves
Black spots on camellia leaves can appear for several reasons, and identifying the exact cause is the first step toward effective treatment. Below are the most common causes that lead to this problem:
Fungal Infections
The most frequent cause of black spots on camellia leaves is a fungal disease. Two major culprits are:
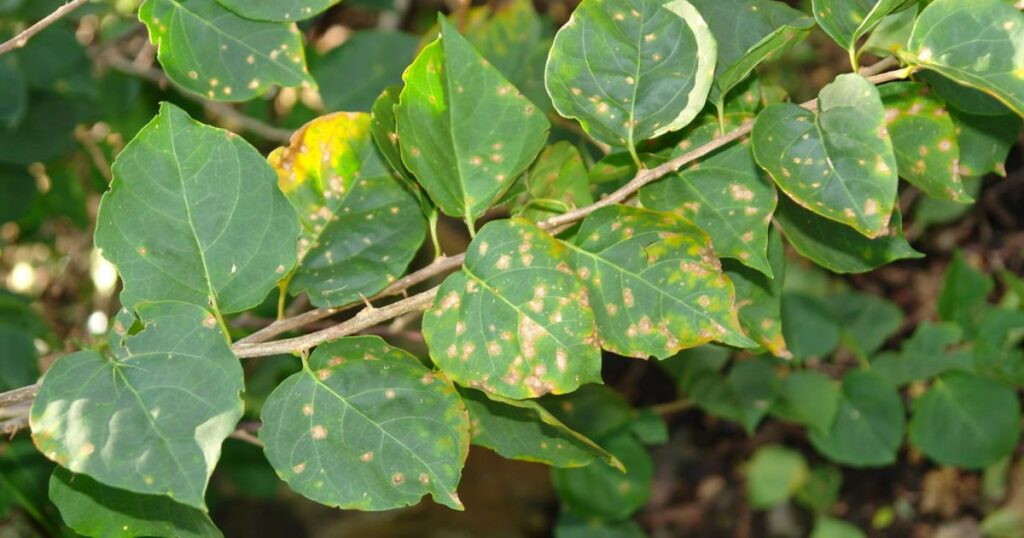
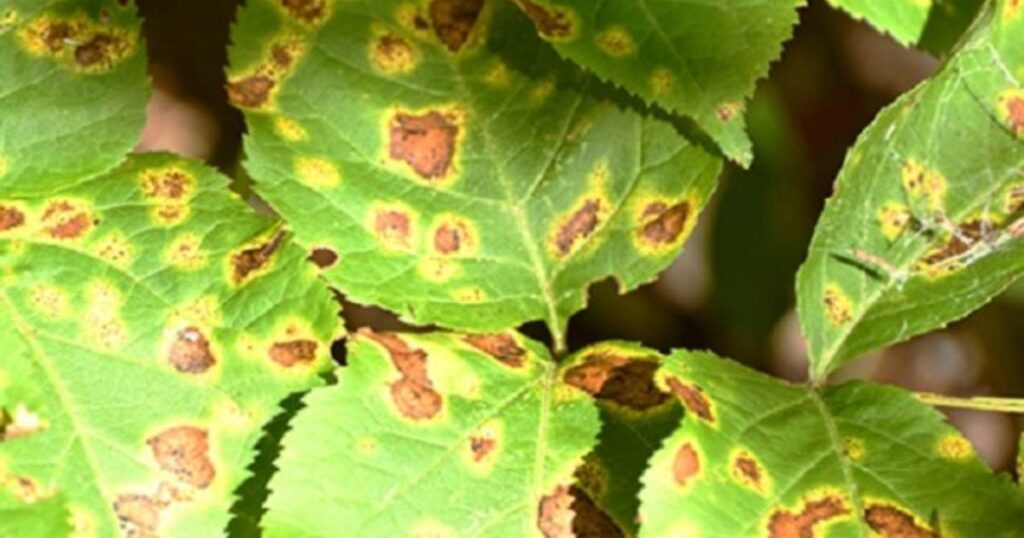
Camellia Leaf Spot (Pseudocercospora species):
This fungus creates small, dark brown to black circular spots that may merge into larger patches over time. In extreme situations, it may result in early leaf drop.
Sooty Mold:
This black, powdery coating on leaves doesn’t infect the leaf directly but grows on honeydew secreted by insects such as aphids, whiteflies, and scales. It blocks sunlight and hinders photosynthesis, giving leaves a dirty or dull appearance.
Pest Infestation
Aphids, scale insects, and whiteflies are examples of pests. Feed on camellia sap, producing a sticky substance known as honeydew that encourages fungal growth. These pests also weaken the plant, making it more susceptible to leaf diseases.
Poor Air Circulation
Camellias grown in tight or shaded spaces often suffer from poor airflow, allowing humidity and moisture to linger around the leaves. This damp environment promotes the growth of fungal spores and mold.
Overwatering or Waterlogged Soil
Root rot can result from excessive water surrounding the roots. Weakening the plant’s immune system. Damp conditions also make leaves more susceptible to fungal infections, which can cause black spotting.
Nutrient Imbalance
The absence of vital nutrients, particularly potassium and nitrogen, can cause weak foliage that’s easily affected by disease. On the other hand, excessive fertilizer can burn the roots and stress the plant, contributing to leaf problems.
Environmental Stress
Sudden temperature drops, frost damage, or prolonged exposure to shade can cause damage to leaf tissue. These stress conditions make the leaves more prone to fungal invasion and black spotting.
Recognizing which of these factors is affecting your camellia helps you take the right corrective actions, whether it’s improving airflow, adjusting watering habits, Are Those Stripes Safe Identifying Striped Caterpillars or treating pests to restore your plant’s health and prevent future outbreaks.
Step-by-Step Treatment for Camellia Black Spots
Here’s a clear, actionable treatment plan you can use right away, from immediate fixes to follow-up care and prevention.
Immediate (Day 0–2): Inspect, isolate, and remove
- Inspect carefully. Check both leaf surfaces, new growth, stems, and the soil surface. Look for black circular spots, a sooty black coating, sticky honeydew, or signs of pests (such as aphids, scale, or whiteflies).
- Isolate the plant (if potted). Move it away from other susceptible plants to limit the disease’s spread.
- Remove affected material. Prune out and discard severely infected leaves and small twig-sized branches. Remove dropped leaves from beneath the plant (don’t leave them on the ground).
Make clean cuts into healthy wood when removing infected branches (cut back a little past the diseased area).
Sanitize tools & hands
- Disinfect pruning tools between cuts. Wipe blades with 70% isopropyl alcohol or a household bleach solution (1 part bleach: 9 parts water). Rinse and oil your tools after using bleach to prevent corrosion.
- Wash your hands and gloves after working on infected plants.
Clean leaves (if sooty mold/honeydew present)
- Rinse leaves. Use a strong spray of water to wash away honeydew and loose spores.
- Soap wash for sticky leaves: Mix a quart of water with a few drops of mild liquid dish soap. A Visual Guide to Identifying Butterflies Test on a single leaf first, gently wash, then rinse. This removes sticky residues that feed sooty mold.
Improve environment (exact day to 1–2 weeks)
- Increase air circulation and light. Thin crowded branches, space plants better, and prune lower branches that trap humidity.
- Adjust watering: Water at the soil level in the morning; avoid overhead watering late in the day. Ensure the soil drains freely. If the pot is rootbound, consider repotting into a fresh, well-draining mix.
- Mulch properly: Keep 2–3 in (5–7 cm) of organic mulch, but keep it away from the trunk base to prevent moisture buildup.
Control pests (if present)
- Manage sap-sucking insects (aphids, scale, whiteflies) because honeydew from these pests encourages sooty mold:
- Try a strong water spray to dislodge them.
- Use insecticidal soap or horticultural oil (follow label instructions). Apply in cooler parts of the day and avoid spraying open flowers to protect pollinators.
- For heavy-scale infestations, consider targeted treatments during dormancy; follow the product labels or consult a professional.
Apply fungicide when necessary.
Choose an appropriate fungicide:
- For mild cases, you can try organic options (copper-based fungicide, sulfur product) or horticultural products labeled for camellias.
- For stubborn or severe leaf-spot diseases, a broad-spectrum contact fungicide or a labeled systemic fungicide may be more effective.
- Follow label instructions exactly. The correct rate, timing, and safety precautions matter. Typical practice: apply at 7–14 day intervals while the disease is active and after heavy rains.
- Do not mix incompatible products (for example, copper and sulfur at the same time). Also, avoid spraying fungicide during hot, sunny midday or when bees are active.
Follow-up monitoring & repeat treatments (weeks 1–8)
- Monitor weekly. Check for new spots, pest activity, and recovery of new leaves.
- Repeat washing/pesticide/fungicide applications according to product directions and until new growth is healthy. Reapply after heavy rains when using contact fungicides.
Sanitation & disposal
- Dispose of infected debris by placing it in a bag and then disposing of it in the municipal waste. The Best Indoor Cat Friendly House plants Avoid adding severely infected leaves to your regular compost pile unless you have a hot compost system that reaches high temperatures.
Long-term prevention (ongoing)
- Routine pruning every season to open the canopy.
- Soil and nutrition: Feed with an ericaceous (acid-loving) plant fertilizer according to camellia needs, avoiding over-fertilizing. Healthy plants resist disease better.
- Seasonal checks: Inspect in spring and after wet weather; treat early signs immediately.
When to seek professional help
- Contact a local extension service, nursery, or plant health professional if:
- Spots continue to spread despite treatment,
- Large portions of the plant defoliate, or
- You’re unsure of the diagnosis (fungus vs. nutrient vs. environmental).
Natural Remedies for Treating Black Spots on Camellia Leaves
If you prefer to keep your garden free from harsh chemicals, several natural and eco-friendly remedies can effectively help manage black spots on camellia leaves. These treatments are most effective when used consistently and early, allowing your plants to recover while protecting the surrounding environment.
Neem Oil Spray
Neem oil is one of the most effective natural treatments for fungal diseases and pest infestations.
- How it works: It acts as both a fungicide and insect repellent, How to Identify Fungi That Grows on Trees stopping fungal spores from spreading while keeping pests like aphids and scale insects under control.
- Use: Combine one teaspoon of mild neem oil with two teaspoons of neem oil. Liquid soap in 1 liter of water. Shake well and spray on affected leaves every 7–10 days, preferably in the early morning or evening.
Baking Soda Solution
Baking soda helps alter the leaf’s surface pH, making it difficult for fungal spores to thrive.
- Recipe: Mix 1 teaspoon of baking soda with 1 liter of water and a few drops of mild dish soap.
- Application: Spray the affected leaves evenly once a week until the spots disappear. Avoid overuse, as excessive baking soda can cause leaf burn.
Vinegar Solution (Mild Acidic Wash)
A diluted vinegar solution can help remove surface mold and inhibit further fungal growth.
- Recipe: Mix one liter of apple cider vinegar with one tablespoon of water.
- How to use: Spray lightly on the leaves and wipe gently with a soft cloth. Use this method occasionally, as frequent application may stress the camellia plant leaves turning yellow
Compost Tea
Compost tea is a nutrient-rich, microbe-filled liquid that enhances plant immunity and helps naturally suppress fungal diseases.
- How to make: Soak 2 cups of mature compost in a bucket of water for 24–48 hours, stirring occasionally. Strain and use the liquid to spray on the leaves or water the base of the plant every 2–3 weeks.
Garlic or Cinnamon Extract
Both garlic and cinnamon contain natural antifungal properties that can help reduce the spread of black spots.
- Garlic spray: Crush 2–3 garlic cloves, soak them in a liter of water overnight, then strain and spray the liquid on the leaves.
- Cinnamon water: Mix 1 teaspoon of cinnamon powder with 1 liter of warm water, let it sit for a few hours, then strain and apply the liquid to the affected leaves.
Preventive Care for Healthy Camellia Plants
Preventing black spots on camellia leaves is much easier than treating them after they appear. With a few simple habits, you can keep your camellias strong, vibrant, and disease-free throughout the year.Start by planting camellias in well-draining, slightly acidic soil and in a spot with good air circulation. Avoid areas with excessive shade where humidity tends to linger. The perfect conditions for fungal development. Water deeply but infrequently, keeping the soil consistently moist without allowing it to become soggy. Always water at the base to prevent wetting the leaves.
Regular pruning is essential. Remove dense inner branches to allow sunlight and air to reach the inner canopy. This reduces moisture buildup and helps leaves dry quickly after rain. Covering the base with a 2–3 inch layer of organic mulch helps preserve the temperature and moisture content of the soil, What Are Basil Black Spots and How Can You Eliminate Them? but keep it slightly away from the trunk to avoid rot.Feed your camellias with a balanced, acid-loving fertilizer during the growing season to strengthen their immune system. Lastly, keep a close eye on your plants, inspecting them regularly for pests or changes in their leaves, and remove fallen leaves or debris promptly. Consistent care and cleanliness are the keys to keeping your camellia leaves lush, glossy, and beautifully spot-free.
Camellia Plant Leaves Turning Brown
If your camellia plant’s leaves are turning brown, it’s a sign that something is stressing the plant, often related to issues with water, sunlight, or disease. One of the most common causes is leaf scorch, which occurs when camellias receive excessive direct sunlight or insufficient water during hot, dry weather. The leaf edges may turn crispy and brown, especially in younger plants or those newly planted.Improper watering is another major culprit. Camellias prefer evenly moist, well-draining soil. Root rot can result from overwatering, but underwatering can also cause the plant to become dehydrated, leading to browning leaves in both cases. Poor drainage or heavy clay soil can trap water around the roots, depriving them of oxygen and leading to stress.
Root rot and leaf blight are examples of fungal infections. It can also cause leaves to turn brown, often accompanied by wilting or yellowing before the leaf dies. yellow spots on camellia leaves To prevent this, ensure the soil drains well, avoid wetting the foliage, and prune regularly to improve airflow.Finally, nutrient imbalance or frost damage may also cause brown patches. Feed camellias with an acid-forming fertilizer and protect them from cold winds. With proper watering, shading, and maintenance, your camellia will regain its lush green health.
Why Are the Leaves on My Camellia Turning Yellow?
Yellowing leaves on a camellia plant typically indicate a nutrient deficiency, poor drainage, or environmental stress. One of the most common reasons is iron chlorosis, which occurs when the soil is too alkaline. Camellias thrive in slightly acidic soil (pH 5.5–6.5). If the pH rises, the roots can’t absorb iron properly, causing older leaves to turn yellow while the veins stay green.Because too much moisture suffocates the roots and restricts nutrient uptake, yellowing can also result from overwatering or poorly drained soil. Conversely, drought stress or underwatering can cause leaves to turn yellow and fall off prematurely.Another frequent cause is nutrient deficiency, particularly a lack of nitrogen 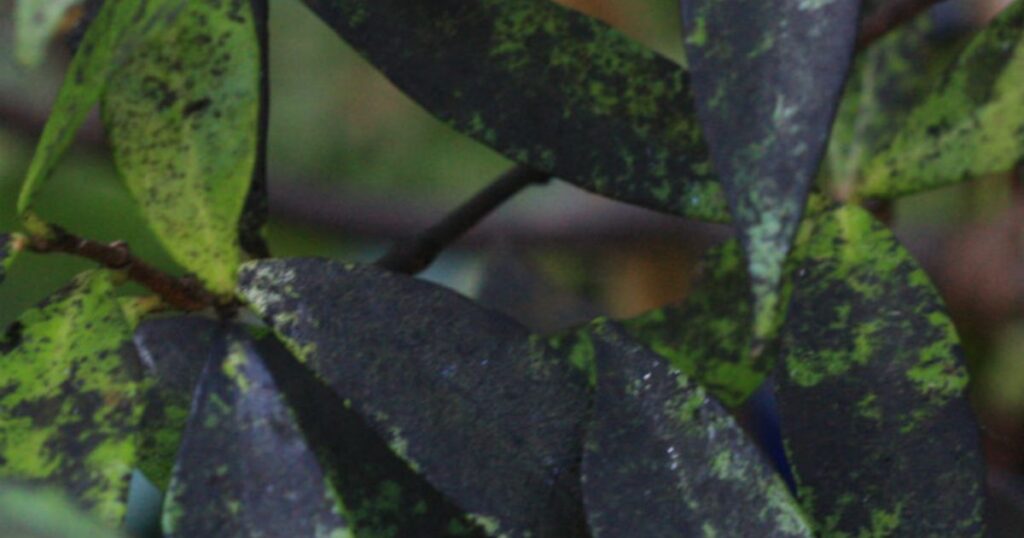 or magnesium. Feeding camellias with an acid-loving fertilizer during the growing season helps restore leaf color and plant vigor.Environmental factors, such as excessive sun, sudden temperature changes, or transplant shock, may also contribute to yellowing leaves. To fix the problem, check soil pH, adjust watering habits, and provide mulch to keep roots cool and moist. With consistent care and balanced nutrition, your camellia’s glossy green leaves will soon return to full health.
Conclusion
Camellias are beautiful, resilient plants, but like any living thing, they need the proper care to stay healthy and vibrant. Black spots, browning, or yellowing leaves are all signs that your camellia is under stress, often due to fungal infections, poor watering habits, or environmental imbalances. By identifying the root cause early and taking simple steps such as pruning affected leaves, improving air circulation, adjusting watering, and using natural or chemical treatments wisely, you can restore your plant’s beauty and strength.
Treatment is essential, but so is preventive care. Keep the soil slightly acidic, maintain good garden hygiene, and monitor your plants regularly for early signs of trouble. A well-cared-for camellia rewards you with lush green foliage and stunning blooms season after season. With a bit of patience and attention, leaves turning brown on camellia your camellia will thrive, remaining one of the most elegant highlights of your garden.
FAQ
What causes black spots on camellia leaves?
Black spots are typically caused by fungal infections, such as Camellia Leaf Spot or sooty mold, which are often encouraged by poor air circulation, excess moisture, or pest activity.
Can black spots kill my camellia plant?
While black spots rarely kill camellias outright, if left untreated, they can weaken the plant, cause premature leaf drop, and reduce flowering. Severe infestations may stress the plant over time, making it more susceptible to other diseases.
How can I prevent black spots on camellia leaves?
Plant camellias in well-draining, slightly acidic soil with good air circulation. Avoid overhead watering, prune regularly to open the canopy, apply mulch correctly, and remove fallen leaves to prevent the spread of disease.
Are black spots contagious to other plants?
Yes, fungal spores can spread to nearby susceptible plants through wind, rain, or contaminated gardening tools; therefore, proper sanitation and plant spacing are crucial.
How often should I apply fungicide for black spots?
For active fungal infections, fungicide treatments are typically applied every 7–14 days until new growth is healthy and free from disease. Always follow the product label instructions for the correct frequency and dosage.
Can natural remedies really help with black spots?
Yes. Neem oil, baking soda sprays, vinegar washes, compost tea, and extracts of cinnamon or garlic can be effective for mild fungal infections when applied consistently, along with proper plant care.