
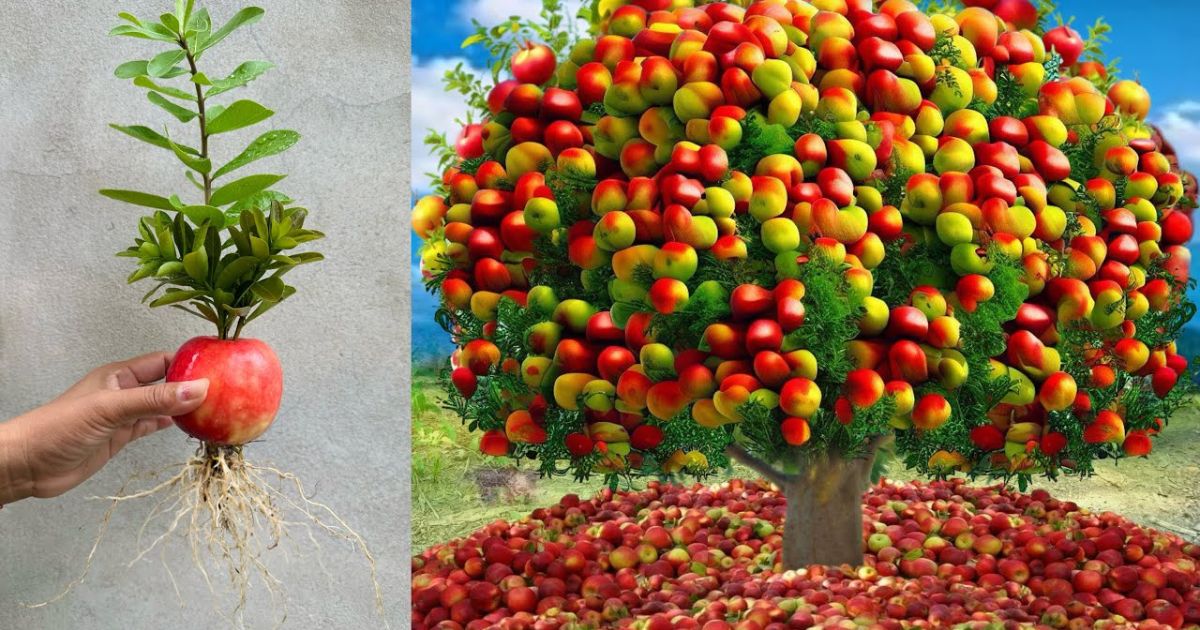
Grafting an apple tree is one of the most rewarding skills any gardener can learn. It’s a simple yet fascinating process that lets you grow your favorite apple varieties on a single tree, or even revive an old one. By joining a piece of a desired apple variety (called the scion) with a strong, healthy base (the rootstock), you can create a new tree that combines the best traits of both.Whether you want to preserve a beloved heritage apple, improve disease resistance, or speed up fruit production, grafting makes it possible. Unlike growing from seed, which can take years and produce unpredictable results, grafting ensures your new tree bears the exact fruit you want in a much shorter time.
In this guide, we’ll walk you through everything you need to know, from choosing the right rootstock and scion to performing the graft step by step. By the end, you’ll have the confidence to start grafting your own apple trees and enjoy the satisfaction of growing a truly custom orchard right in your backyard.
What Is Grafting and Why Does It Work
Grafting is a centuries-old horticultural technique used to propagate fruit trees, especially apples. It involves joining two different parts of a tree: the scion, a young shoot or twig from a desired apple variety, and the rootstock, which provides the root system and the lower trunk. When done correctly, the two pieces grow together and form a single, living plant.Think of grafting as a natural partnership. The scion determines what kind of fruit the new tree will produce, while the rootstock controls the tree’s size, growth rate, and resistance to diseases or environmental stress. This combination allows growers to create stronger, more productive apple trees that maintain fruit quality.Grafting works because both the scion and the rootstock share similar biological structures. When their cambium layers, the thin layer of actively growing cells beneath the bark, are aligned and held together, they start to fuse. Over time, new tissue forms between them, connecting the vascular systems so that water and nutrients can flow freely. How Do You Know When a Tree Is Dead This fusion process allows the graft to heal and form a single, unified plant.
The success of grafting lies in compatibility. apple tree grafting can generally be grafted onto other apple varieties because they belong to the same species. However, grafting apples onto unrelated fruit trees (such as peaches or cherries) won’t work because of genetic differences.In short, grafting is both an art and a science, a way to clone the best apple trees while improving their resilience and productivity. It’s the reason you can enjoy crisp, flavorful apples from trees that might otherwise never have existed naturally.
Best Time to Graft an Apple Tree
Timing is one of the most critical factors for successful apple tree grafting. The best time to graft an apple tree is usually in late winter to early spring, just before new growth begins. During this period, the tree is still dormant, but its sap is about to start flowing, creating the perfect conditions for the graft to heal and bond.As temperatures begin to warm and buds start to swell, the cambium layer (the thin growth tissue beneath the bark) becomes active. apple grafting techniques is crucial because the cambium from both the scion and rootstock must be alive and actively dividing for the graft to take. If you graft too early, the tissues may dry out and fail to unite. If you graft too late, the rapid sap flow can cause the graft to slip or become waterlogged.
For whip and tongue or cleft grafts, aim for early spring when temperatures are consistently above freezing. Bud grafting, on the other hand, works best in mid to late summer, when the bark is “slipping” easily.By aligning your grafting work with your tree’s natural growth cycle, you’ll significantly improve your chances of success and enjoy a thriving, fruit-bearing apple tree.
Choosing the Right Rootstock and Scion
Selecting the right rootstock and scion is the foundation of a successful apple tree graft. Each has a distinct impact on the tree’s health. Health, size, and fruit quality, so choosing wisely can make all the difference.The rootstock forms the lower part of the graft and includes the roots. It determines how large your apple tree will grow, how well it resists diseases, and how it adapts to soil conditions. For example, dwarf rootstocks like M27 or M9 produce smaller trees that are easy to harvest and ideal for small gardens, while semi-dwarf or standard rootstocks such as MM106 or M111 create larger, more robust trees with deeper root systems. Always choose a rootstock that matches your climate, soil type, and available space.
The scion, on the other hand, is a cutting taken from a healthy, productive apple tree that bears the fruit variety you want. Select a scion from a disease-free tree with a good fruiting history. Please make sure both the rootstock and scion are compatible, meaning they belong to the same species (Malus domestica) or closely related varieties.By pairing a vigorous rootstock with a high-quality scion, you create a strong, balanced apple tree that offers reliable growth and delicious fruit for years to come.
Tools and Materials You’ll Need
Before you begin grafting an apple tree, gathering the appropriate equipment and supplies is crucial. Using clean, sharp, and proper equipment ensures precise cuts and helps prevent infections that could ruin your graft. Here’s what you’ll need:
- Grafting Knife or Sharp Pruning Knife:
- A sharp, clean knife is vital for making smooth, even cuts on both the rootstock and scion. Specialized grafting knives feature a single bevel, allowing for more precise slicing.
- Pruning Shears:
- Use high-quality pruning shears to trim branches and prepare How to Trim an Overgrown Magnolia Tree your scion and rootstock.
- Grafting Tape or Parafilm:
- These flexible tapes are used to wrap and secure the graft union, keeping the joint tightly sealed while preventing it from drying out.
- Grafting Wax or Sealant:
- This helps protect the graft area from moisture loss, pests, and diseases until it heals completely.
- Rubber Bands or Twine:
- Helpful in providing extra support and holding the graft in place during the healing process.
- Disinfectant or Alcohol Wipes:
- Always sterilize your tools before and after each cut to reduce the risk of spreading disease.
- Label Tags and Marker:
- Label your grafts with the variety name and date so you can track progress later.
Popular Grafting Methods for Apple Trees
There are several different ways to graft an apple tree, and the best method depends on the size of your rootstock and scion, as well as the time of year. Understanding the most common grafting techniques will help you choose the right one for your situation.
Whip and Tongue Graft
This is one of the most popular methods for grafting young apple trees. It works best when the rootstock and scion are about the same thickness (usually pencil-sized).
- How it works: Both pieces are cut diagonally with a small “tongue” notch to interlock them securely.
- Best time: Late winter to early spring, when trees are dormant.
- Benefits: Provides intense contact between the cambium layers, How to Stake a Tree That Is Leaning: Step by Step Guide resulting in a high success rate.
Cleft Graft
Ideal for joining a more diminutive scion to a larger rootstock or for top-working an older tree.
- How it works: The rootstock is split down the middle, and one or two scions are inserted into the cleft.
- Best time: Early spring before new growth begins.
- Benefits: Great for changing varieties or rejuvenating older apple trees.
Bark Graft
Used when grafting onto mature or thick branches where the bark “slips” easily.
- How it works: The bark of the rootstock is gently lifted, and the scion is inserted between the bark and wood.
- Best time: Mid to late spring, when sap flow is active.
- Benefits: Excellent for large trees and easy to perform.
Bud Graft (T-Budding)
A popular summer grafting method that uses a single bud instead of a scion stick.
- How it works: The rootstock’s bark is cut into a T shape, and a bud from the desired variety is placed inside.
- Best time: Mid to late summer when the bark separates easily.
- Benefits: Requires minimal materials and heals quickly.
Each method has its own advantages, How to Plant Trees: A Comprehensive Step-by-Step Guide so beginners often start with the whip-and-tongue or cleft graft, as they’re easier to learn and have high success rates.
Step-by-Step: How to Graft an Apple Tree
Once you’ve chosen your whip and tongue graft apple method and prepared your materials, it’s time to begin. Follow these simple steps to graft an apple tree successfully:
Step 1: Prepare the Rootstock
Start by selecting a healthy, disease-free rootstock. Cut it cleanly at the desired height using a sharp knife or pruning shears. For most grafts, a clean, smooth surface helps the scion attach firmly. If you’re doing a cleft graft, make a vertical split about 2 inches deep into the top of the rootstock.
Step 2: Prepare the Scion
Choose a scion from a healthy apple tree that produced good-quality fruit last season. Cut a piece about 4–6 inches long with 2–4 buds. Make a slanting cut at the base of the scion so it matches the shape and size of the rootstock cut.
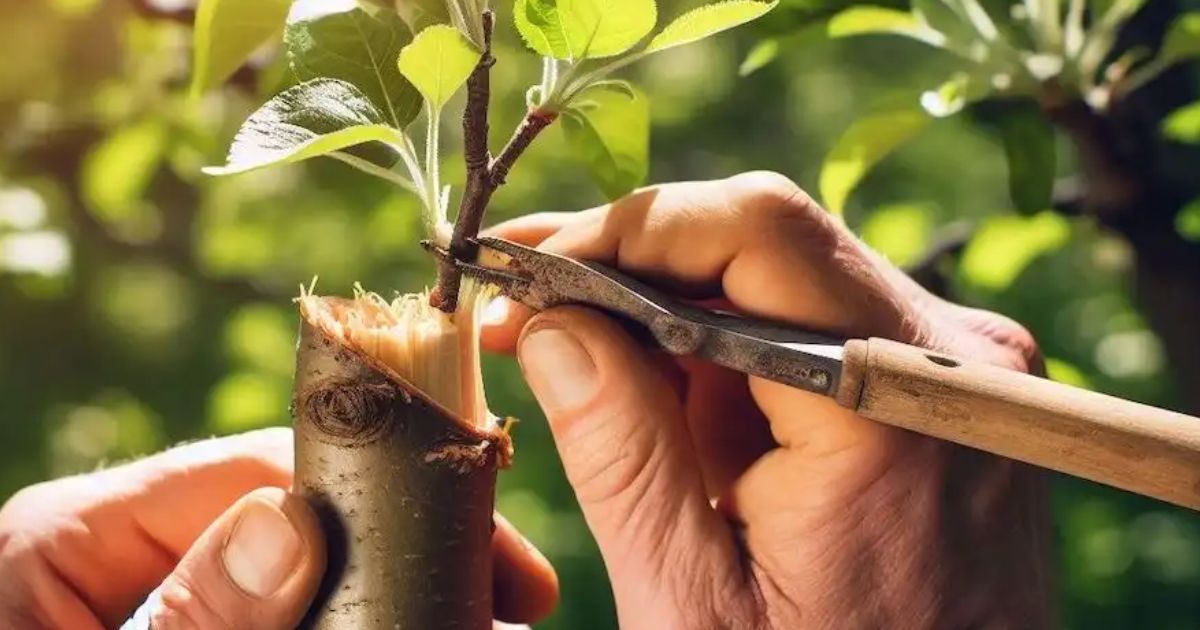
Step 3: Align the Cambium Layers
This is the most crucial step. Carefully align the cambium layers (the thin green layer beneath the bark) of the rootstock and scion. Proper alignment ensures that nutrients and water can flow between the two parts, allowing them to grow together.
Step 4: Secure the Graft
Once the scion and rootstock are correctly fitted, wrap the cleft graft apple tree with grafting tape, parafilm, or a rubber band. Make sure no gaps remain, as air exposure can dry out the tissue. Apply grafting wax or sealant over the joint to lock in Moisture and protect against infections.
Step 5: Label the Graft
Use a durable tag to label the graft with the apple variety name and date. This helps you track the progress and know when each graft was made.
Step 6: Provide Post-Graft Care
Place the grafted tree in a sheltered spot, away from direct sunlight and strong wind. Keep the soil moist but not waterlogged. Within a few weeks, you should notice new growth from the scion. This means the graft was successful.
By following these steps carefully and keeping your tools clean, you’ll give your graft the best chance to take and grow into a strong, productive apple tree.
Caring for a Newly Grafted Apple Tree
After successfully grafting your bud graft apple tree, proper care is essential to ensure the graft heals and the tree grows strong. Here’s how to care for a newly grafted tree:
Protect the Graft
Keep the grafted area shielded from direct sunlight, strong winds, and heavy rain. Using a protective cover or planting in a slightly sheltered spot helps prevent the scion from drying out or being damaged.
Monitor for Growth
Within a few weeks, look for signs of new growth from the scion. This indicates the graft has successfully taken. Remove any shoots or growth from the rootstock below the graft to allow the scion to thrive.
Remove Wrapping at the Right Time
Once the graft has fully united and the scion is actively growing, carefully remove the grafting tape or parafilm. Leaving it on too long can restrict the branch’s growth.
Protect from Pests and Diseases
Keep an eye out for pests like aphids or fungal infections that could damage the young graft. Use organic sprays or protective barriers, as needed.
With careful attention during the first few months, your grafted apple tree will establish a strong union and continue growing into a healthy, fruit-bearing tree.
Common Mistakes to Avoid
Grafting an apple tree can be highly rewarding, but beginners often make avoidable mistakes that reduce the chances of success. Here are the most common pitfalls and how to prevent them:
Misaligned Cambium Layers
The cambium layer is the key to a successful graft. If the scion and rootstock cambium layers are not properly aligned, the graft won’t heal, and the scion may die. Always take your time to line the layers carefully.
Using Dull or Dirty Tools
Dull knives or pruning shears create jagged cuts, making it harder for the graft to unite. Dirty tools can also spread disease. Always use sharp, sterilized tools for clean cuts.
Grafting at the Wrong Time
Timing is crucial. Grafting too early in winter or too late in spring can prevent the graft from taking. Follow seasonal guidelines: dormant rootstock in early spring for most grafts, and mid-summer for bud grafting.
Poor Sealing of the Graft
Exposed grafts can dry out or become infected by pests and fungi. Wrap the graft tightly with grafting tape or parafilm, and use wax or sealant to protect it from moisture loss and disease.
Neglecting Post-Graft Care
Even a perfectly executed graft can fail if the tree isn’t cared for afterward. Keep the soil moist, protect the graft from extreme weather, and monitor for pests.
Avoiding these mistakes greatly increases your chances of creating a strong, productive apple tree.
When Will a Grafted Apple Tree Bear Fruit?
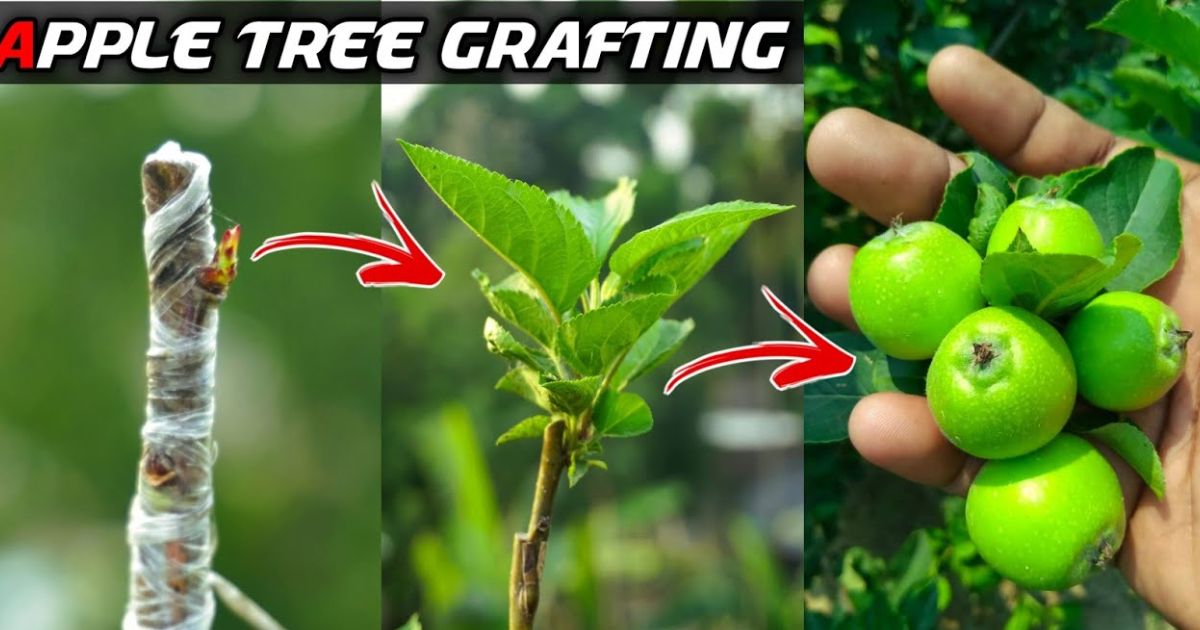
One of the most significant advantages of grafting apple trees is that they usually bear fruit much sooner than trees grown from seed. While seed-grown trees can take 7–10 years or more to produce apples, a properly grafted tree often begins fruiting in 2–4 years, depending on the variety and rootstock used.
Several factors influence when a grafted apple tree will bear fruit:
- Type of Rootstock: Dwarf and semi-dwarf rootstocks generally produce fruit earlier than standard-sized trees. For example, a dwarf rootstock may start fruiting in 2–3 years, while a standard rootstock could take 4–5 years.
- Scion Variety: Some apple varieties naturally mature faster than others. Early-season apples like ‘Gala’ or ‘Fuji’ may produce fruit sooner than late-season varieties.
- Tree Care: Proper watering, fertilization, pruning, and pest and disease protection all help encourage early fruit production.
- Climate and Soil: Trees in optimal growing conditions, well-drained soil, adequate sunlight, and suitable temperatures tend to mature faster.
Patience is key. While you may see a few small apples in the early years, When to Prune Pear Trees the tree will gradually increase its yield as it matures. Regular care and monitoring will ensure a healthy, productive grafted apple tree for years to come.
Conclusion
Grafting an apple tree is both an art and a science, allowing gardeners to grow healthy, productive trees with the exact fruit variety they desire. By understanding the right timing, choosing compatible rootstock and scion, using proper tools, and following careful grafting techniques, anyone can successfully create a thriving apple tree.While it requires patience and attention to detail, the rewards are well worth the effort. Not only will you enjoy earlier fruit production compared to seed-grown trees, but you’ll also have the satisfaction of nurturing a tree that combines the best qualities of both rootstock and scion.
With proper post-graft care, protection from pests, and consistent monitoring, your grafted apple tree can provide years of delicious, homegrown apples. So gather your tools, select your favorite apple variety, and start your grafting journey. It’s a simple step toward a more fruitful and fulfilling garden.
FAQ
Can you graft any apple variety onto another?
Not all apple varieties are compatible. For the best results, graft scions and rootstocks from the same species (Malus domestica) or closely related varieties. Apples generally graft well onto other apple trees, but grafting onto unrelated fruit trees usually fails.
How long does it take for a graft to heal?
Most grafts start to unite within 2–4 weeks, but complete healing and strong growth usually take several months. Keep the graft protected and monitor for new growth to confirm success.
Can I graft an apple tree onto a seed-grown rootstock?
Yes, seed-grown rootstocks can be used, but grafting onto established, healthy rootstock ensures better growth and a higher success rate.
Do grafted apple trees live as long as seed-grown trees?
Yes. A grafted apple tree can live just as long as a seed-grown tree, often 30–50 years or more, depending on care, soil, and climate conditions.
What is the easiest grafting method for beginners?
The whip-and-tongue graft is ideal for beginners because it provides intense cambial contact and works well with small, same-sized rootstock and scion. For summer grafting, bud grafting (T-budding) is also simple and effective.