
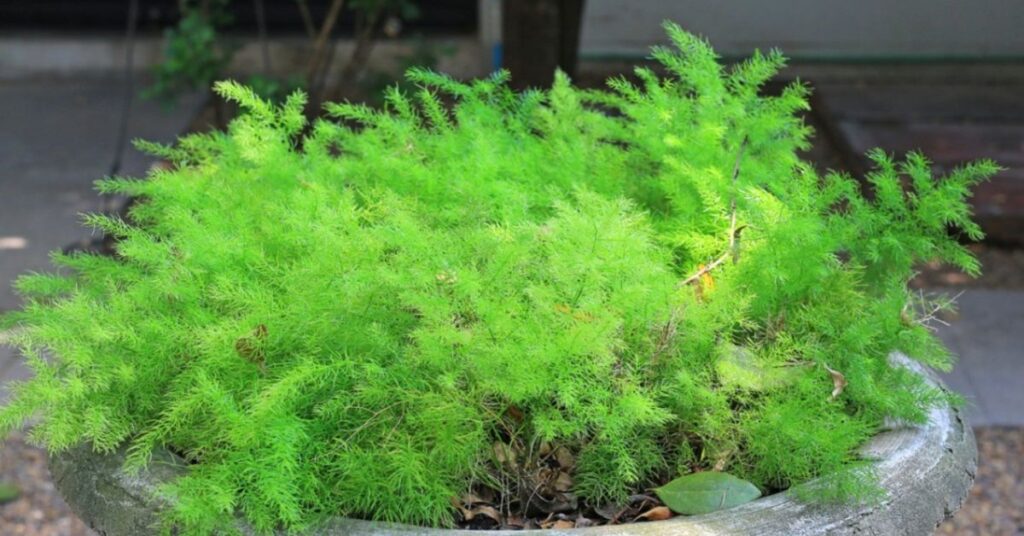
Asparagus ferns are beautiful, feathery plants thatgive any indoor or outdoor area a dash of sophistication. Despite their name, they aren’t true ferns but lily family members. These hardy, low-maintenance plants are loved for their lush greenery and ability to thrive in various conditions.Whether you want to grow them as houseplants or in your garden, understanding the proper care techniques will help them flourish. This guide will explore everything you need to know about increasing asparagus ferns—from planting and watering to propagation and pest control. Let’s dive in.
Asparagus Fern Care Guide
Growing Conditions
- Light: Prefers dappled shade but can adapt to more light. Avoid direct sunlight to prevent scorching.
- Soil: Thrives in organically rich, well-draining soil with a slightly acidic pH (6.5-6.8). Ensure pots have drainage holes.
- Water: Requires consistent moisture. Mist daily for humidity, especially indoors during dry seasons.
- Temperature & Humidity: Best in temperatures between 55°F and 70°F. Avoid sudden temperature drops.
Fertilizing
- Feed with a diluted liquid or water-soluble all-purpose fertilizer.
- Apply monthly in spring and weekly in summer for container plants.
Warning
asparagus fern propagation is considered invasive in Florida, Texas, How to Take Hydrangea Cuttings and Hawaii when grown outdoors.
Popular Varieties
- ‘Myeri’ (Foxtail Fern): Dense, upright foliage.
- ‘Sprengeri’ (Emerald Fern): Long, mounded stems.
- ‘Sprengeri Compacta’: A dwarf version of ‘Sprengeri.’
- ‘Nana’: Compact with bright green leaves.
Plant Maintenance
Pruning
- Trim at the base to control growth (up to 2 inches per day).
- Never take out more than one-third of the plant at once.
- Wear gloves—sharp stems can irritate.
Propagation
- Division: Split tuberous roots in spring and replant.
- Seeds: Extract from ripe red berries, The Best Containers for Seed Storage soak overnight, and press onto soil for germination.
Potting & Repotting
- Choose a sturdy pot—roots grow aggressively and may crack containers.
- Report regularly and divide when necessary.
Overwintering
- Move plants indoors when temperatures fall below 55°F.
- Keep in bright, indirect light, away from drafts and heaters.
Different Types of Asparagus Ferns
Asparagus ferns are popular for their delicate, airy foliage and are used indoors and outdoors. Despite the name, they aren’t true ferns but are members of the Asparagus genus. There are several types, each with unique features:
1. Asparagus densiflorus ‘Sprengeri’ (Sprenger’s Asparagus Fern):
This is the most common variety. It has arching stems with needle-like leaves and can spread rapidly. It’s excellent in hanging baskets or as ground cover in warm climates.
2. Asparagus densiflorus ‘Myersii’ (Foxtail Fern):
Known for its upright, plume-like fronds that resemble foxtails, How to Care for Golden Pothos this type is more compact and structured. It’s often used in formal gardens or containers.
3. Asparagus setaceus (Lace Fern or Asparagus Plumosus):
This variety has delicate, lace-like foliage and is often used in floral arrangements. It’s popular as a houseplant due to its delicate, ornamental look.
4. Asparagus falcatus (Sickle Thorn or Climbing Asparagus):
A climbing variety with larger, sickle-shaped leaves. It can be trained on trellises or fences and has small, thorny stems.
Each type has charm and can suit different settings—from indoor décor to lush outdoor landscaping.
How to Care for Asparagus Fern
Asparagus ferns are low-maintenance plants but thrive best with the proper care. Here’s how to keep your fern healthy and vibrant:
- Light: Provide bright, indirect light. How to Grow Calathea Indoors: Although they can withstand some shade, filtered sunlight is ideal for their growth.
- Watering: Keep the soil consistently moist but not soggy. Water the top inch of soil when it seems dry.
- Humidity is a preference of asparagus ferns. Place the pot near a humidifier or mist the leaves on a regular basis.
- Fertilization: Use a balanced liquid fertilizer every two to four weeks.weeks during the growing season.fertilizer every two to four weeks.
- Pruning: Trim yellow or dead fronds to encourage new growth and maintain a bushy shape.
- Repotting: Repot every 1-2 years if the roots outgrow the pot. Growing Asparagus Use well-draining soil.
Your propagate asparagus fern will thrive with proper care, adding lush greenery to your space.
How to Propagate Asparagus Fern
Propagating asparagus ferns is easy and can be done using division or seeds. Here’s how:
Propagation by Division (Easiest Method)
- Carefully remove the plant from its pot.
- Gently separate the root ball into smaller sections, ensuring each has healthy roots and stems.
- Replant each division in fresh, well-draining soil.
- Water thoroughly and keep in a warm, humid environment.
Propagation by Seeds
- Collect ripe red berries from the plant and remove the seeds.
- Soak the seeds overnight to soften them.
- Sow in damp soil and store in a warm, The No-Brainer Guide to Starting Seeds Indoors bright location.
- Wait a few weeks for germination to occur!
Common Problems and Solutions for Asparagus Ferns
asparagus fern maintenance light requirements are hardy plants, but they can sometimes face issues. Here are some common problems and how to fix them:
1. Yellowing Leaves
Cause: Overwatering, underwatering, or too much direct sunlight.
Solution: Ensure the soil stays slightly moist but not soggy. Place the plant in bright, indirect light.
2. Drooping or Wilting Foliage
Cause: Lack of water, low humidity, or root-bound conditions.
Solution: Water regularly, mist the leaves, and repot if the roots are overcrowded.
3. Brown or Crispy Leaf Tips
Cause: Dry air, low humidity, or over-fertilization.
Solution: Increase humidity by misting or using a humidifier. Avoid over-fertilizing.
4. Pests (Spider Mites, Mealybugs, Aphids)
Cause: Dry conditions attract pests.
Solution: Wipe leaves with soapy water or use insecticidal soap. Keep humidity levels high to deter pests.
5. Slow Growth or Leggy Appearance
Cause: Insufficient light or lack of nutrients.
Solution: During the growing season, fertilize the plant every two to four weeks and move it to a brighter location.
With proper care, your asparagus fern will stay lush and healthy.
Propagating Asparagus Ferns
Asparagus ferns can be propagated easily Why the Banana Plant is Actually an Herb AND a Berry using two methods: division and seeds.
Propagation by Division (Best Method)
An sprengeri fern care can be propagated most easily by splitting its
Steps:
- In spring, carefully dig up the plant (or remove it from its pot). Wear gloves to protect yourself from sharp spikes.
- Use a trowel or sharp knife to divide the root clump into sections. Each section should have roots and at least one growing shoot.
- Replant the divided sections in new pots or garden locations with fresh, well-draining soil.
- Keep the newly planted divisions in a shaded area until new growth appears.
Propagation by Seeds (Takes Longer)

Mature plumosus asparagus fern light requirements maintenance produce small red berries containing seeds. These can be used to grow new plants.
Steps:
- Wait for the berries to fully ripen and turn red.
- Mash the berries and strain out the tiny black seeds (usually 1–3 per berry).
- Scarify and soak the seeds in water overnight to speed up germination.
- Press the seeds lightly onto the soil surface—they need light to germinate.
- Maintain the soil in a warm environment (70°F or above) and keep it moist.
- Germination takes a few weeks. Once seedlings develop true leaves, transplant them into larger pots.
Where to Plant Asparagus Fern
Asparagus fern is a hardy, attractive plant known for its feathery, delicate-looking foliage. Despite its name, it’s not a true fern but grows in similar environments. To thrive, it needs the correct location—indoors or in the garden.Outdoors, asparagus fern prefers partial shade to filtered sunlight. It does best in warm, humid climates (USDA Zones 9–11 are suitable for its perennial cultivation. Pick an area where the soil drains easily and is rich in organic matter like compost. It’s best to have morning sun and afternoon shade. Planting in direct sunlight can damage the foliage and steer clear of soggy soil, leading to root rot.
Indoors, place the asparagus fern in a bright room with indirect sunlight. A north- or east-facing window works well. It also appreciates humidity, so especially in dry indoor settings, think about spraying it frequently or setting it close to a humidifier. Asparagus ferns need room to spread, whether planted in the ground, in pots, or in hanging baskets. Their trailing or bushy habit makes them great for borders, containers, or cascading greenery.Choose a protected, lightly shaded location with consistent moisture, and your asparagus fern will flourish beautifully year-round.
Conclusion:
Growing asparagus fern care is simple with the right care. By providing indirect light, well-draining soil, and consistent watering, you can enjoy lush, vibrant foliage. Regular pruning and occasional fertilizing will keep your plant healthy and thriving. Whether grown indoors or outdoors, asparagus fern yellow add a touch of greenery to any space. Follow these tips, and your fern will flourish for years to come!
FAQ
1. What is the easiest way to propagate an asparagus fern?
The easiest and fastest method is division, where you split the plant’s tuberous roots and replant them.
2. Can I grow asparagus fern from seeds?
Yes! You can collect seeds from the plant’s red berries, soak them overnight, and plant them in moist soil. However, seed germination takes several weeks.
3. When is the best time to propagate asparagus fern?
Spring is the ideal time, as theSince the plant is actively growing, new growth can be established more easily.
4. How long does it take for asparagus fern seeds to sprout?
Germination usually takes a few weeks, depending on temperature and humidity levels. Keeping the soil warm and moist will speed up the process.
5. Can I propagate asparagus fern in water?
No, asparagus ferns do not root well in water. It’s best to propagate them in soil through division or seeds.
6. Do I need to mist my propagated asparagus fern?
Mistreating helps maintain humidity, especially for newly divided plants or seedlings.
7. How often should I water newly propagated asparagus ferns?
Keep the soil moist but not soggy. When the top inch of soil seems dry, water.