
Jerusalem artichokes, often called sunchokes buy, are a delightful and nutritious addition to any garden. With their unique nutty flavor and versatile culinary uses, these tubers have gained popularity among home gardeners and chefs. Not only are they easy to grow, but they also thrive in a variety of conditions, making them an ideal choice for both seasoned gardeners and beginners.
This thorough manual will lead you through the entire process of growing Jerusalem artichokes, from planting to harvesting. Whether you’re looking to enhance your vegetable garden or try something new, this article will provide you with the information you need to develop these remarkable tubers successfully. Join us as we explore the best practices for planting, caring for, and harvesting your Jerusalem artichoke
What Are Jerusalem Artichokes?
Jerusalem artichokes, scientifically known as Helianthus tuberosus, are tuberous roots native to North America and part of the sunflower family. They resemble small, knobby potatoes with a rough, brownish skin and a creamy white interior, offering a crunchy texture and a subtly sweet, nutty flavor. Nutritionally, these tubers are a powerhouse high in fiber, particularly inulin, which supports digestive health and may aid in blood sugar regulation. They are also rich in vitamins C and B and minerals like potassium and iron, making them a nutritious addition to any diet. In the kitchen, jerusalem artichoke plant can be roasted, sautéed, or puréed, and they work wonderfully in soups, salads, and stir-fries. They are a versatile ingredient that may enhance a variety of cuisines and promote general wellbeing because of their distinct flavor and health advantages.
Preparing for Planting
Proper preparation before planting is essential to ensure a successful harvest of Jerusalem artichokes. Start by choosing the right location for your tubers. These plants thrive in full sun, requiring six to eight hours a day in direct sunlight to grow robustly and yield abundant tubers. Jerusalem artichokes when to plant it comes to soil type, jerusalem artichoke plant prefer well-drained, loamy soil that retains moisture without becoming waterlogged. This soil type provides the ideal balance of nutrients and drainage, promoting healthy root development.
Before planting, it’s crucial to conduct soil preparation. Begin by testing the soil pH, as growing jerusalem artichokes in a slightly acidic to neutral range of 6.0 to 7.0. For reliable findings, utilize a home testing kit or submit a sample to your local agricultural extension department. If the pH is too high or too low, you can adjust the soil. Additionally, incorporate organic matter such as Add aged manure or compost to the soil to increase its fertility and structure. This will supply vital nutrients to the developing plants and improve soil texture, promoting healthy growth. By taking these preparatory steps, you set the stage for a thriving crop of Jerusalem artichokes.
Planting Jerusalem Artichokes
When planting Jerusalem artichokes, timing is key for a successful harvest. The best planting times are typically in the spring, after the last frost has passed, allowing the soil to warm up and encouraging healthy growth. You can also plant in the fall in milder climates, allowing the tubers to establish roots before the colder months.
To ensure the optimal growing jerusalem artichokes, selecting and preparing your tubers properly is essential. Select solid, robust tubers that are devoid of from blemishes, approximately 1 to 3 inches in size. Look for tubers with at least a few “eyes,” as these are the growth points from which new shoots will emerge. Before planting, you can cut larger tubers into more manageable chunks, making sure that each chunk has a minimum of one eye.
When it’s time to plant, dig holes 2 to 4 inches deep and place the tubers in the ground, ensuring they are oriented with the eyes facing upward. Space the tubers 12 to 18 inches spaced widely apart to give opportunities for expansion and development. Proper spacing helps prevent overcrowding and makes it easier to manage the sunchoke plant as they mature. With these planting techniques, you’ll set the foundation for a fruitful crop of jerusalem artichoke tubers for sale!
Caring for Jerusalem Artichokes
Jerusalem artichokes (sunchoke seeds) are hardy, tuberous perennials that are relatively low-maintenance but benefit from proper care to maximize their yield. Here’s a comprehensive guide to caring for your Jerusalem artichokes:
Watering
Jerusalem artichokes require consistent watering, especially during their early growth stages and the warm summer months. It’s essential to keep the soil moist but not soggy. Root rot and other fungi can result from overwatering issues, while allowing the soil to dry out too much can stress the plants and reduce their tuber production. To strike the right balance, water regularly but ensure that the soil drains well. Without oversaturating the soil, mulching the area surrounding the base of the plants can assist them hold onto moisture.
Fertilizing
For optimal growth, Jerusalem artichokes benefit from a good nutrient base. Use a balanced fertilizer, such as a 10-10-10 blend, to ensure they get the right mix of nitrogen, phosphorus, and potassium. If you prefer organic options, compost or well-rotted manure are excellent choices. The best time to fertilize is at planting to provide initial nutrients, followed by a second application in the mid-growing season to support their vigorous growth. How Onions Can Store Up to a Year Without Spoiling.
Weed and Pest Control
Weed Management
Jerusalem artichokes are resilient plants, but weeds can compete for water and nutrients, potentially stunting their growth. Common weeds like dandelions, chickweed, and clover can often infiltrate the garden. To manage weeds organically, consider mulching with straw or wood chips to suppress their growth. Regular hand weeding is also effective, especially during the early stages of growing jerusalem artichokes when weeds can outcompete young plants.
Pest Control
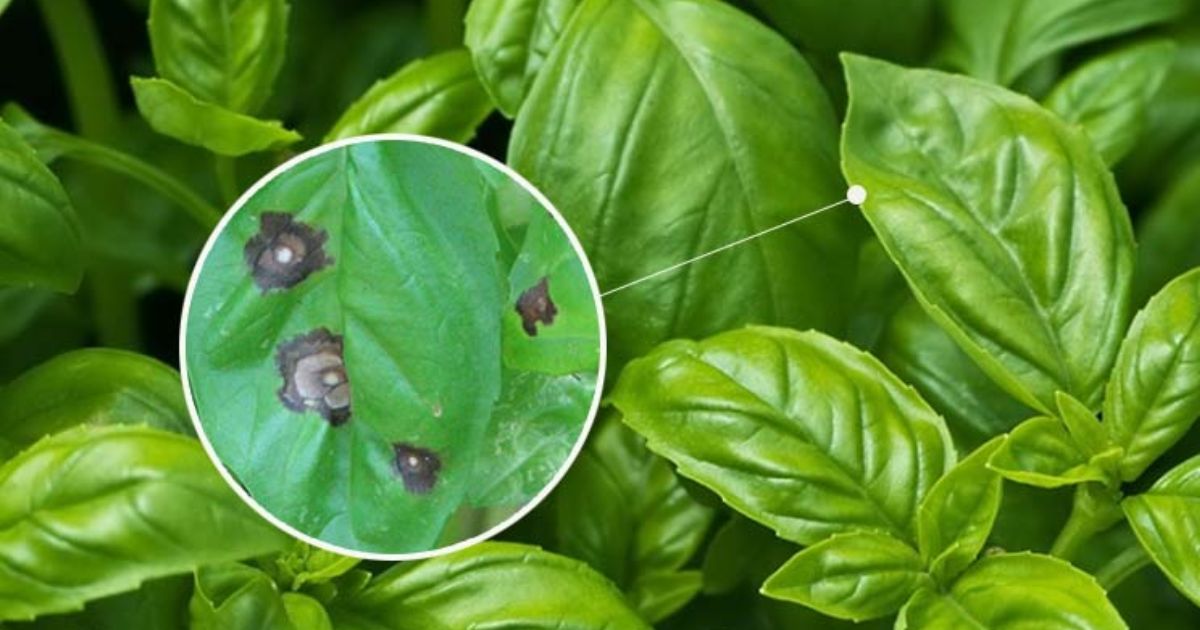
While Jerusalem artichokes are not highly susceptible to pests, aphids and slugs can occasionally pose a problem. Aphids, tiny sap-sucking insects, can weaken the plant by draining its energy. To manage them, spray your plants with a mild soap solution or introduce natural predators like ladybugs. Slugs, on the other hand, are attracted to the moist soil and can damage young shoots. Use organic slug traps, such as beer traps or diatomaceous earth, to deter them without using harmful chemicals.
By monitoring moisture levels, providing the right nutrients, and managing weeds and pests, your helianthus tuberosus for sale will thrive and produce an abundant crop.
Harvesting Jerusalem Artichokes
Jerusalem artichoke tubers are a nutritious and versatile crop; knowing when and how to harvest them will ensure you get the best-quality tubers. Here’s a guide to help you through the process.
When to Harvest
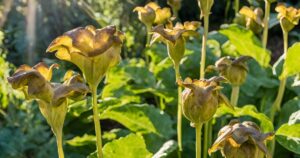
Jerusalem artichokes are typically ready for harvest in late fall, especially after the first frost. The frost helps to sweeten the tubers, improving their flavor. The plants will provide visual cues to indicate that the tubers are ready. Look for the foliage to die back and flowering to occur. These are key signs that the plants diverge energy to the tubers below the soil.
How to Harvest
When it’s time to dig up your Jerusalem artichokes, choose a dry day. Working with dry soil is easier and will help prevent unnecessary damage to the tubers.
Best Tools for Harvesting
The best tools for harvesting Jerusalem artichokes are a garden fork or a shovel. These tools allow you to lift the tubers from the soil with minimal disruption to the surrounding plants. However, it would help if you handled them with care.
Tips for Careful Harvesting
To avoid damaging the tubers:
- Digging should begin at least one foot away from the plant’s root.
- Use the garden fork or shovel to loosen the soil gently, then carefully lift the tubers.
- Try to avoid puncturing or bruising them, as damaged tubers won’t store as well.
- Once harvested, brush off excess soil and let them air dry before storing. You can also leave some tubers in the ground for a continual harvest throughout winter, as they store well in the soil.
You’ll enjoy a bountiful and high-quality harvest of Jerusalem artichokes with the right timing and technique!
Storing and Using Jerusalem Artichokes

Once you’ve harvested your Jerusalem artichokes, proper storage, and creative culinary uses can ensure you make the most of this versatile tuber and How to Prevent Tomato Catfacing.
Post-Harvest Storage
After harvesting, Jerusalem artichokes require some light cleaning before storage. Remove any more dirt with a gentle brush, but do not wash them immediately, as moisture can lead to spoilage. If you must wash them, dry the tubers thoroughly before storage.
Ideal Storage Conditions
Jerusalem artichokes store best in a cool, dark, and humid environment. A root cellar, basement, or refrigerator crisper drawer is ideal. To keep the tubers fresh and prevent drying, the ideal temperature and humidity range are 32–40°F (0–4°C) and 90–95%, respectively. The tubers will keep for several weeks to months if you Put them in a plastic bag with openings, or place them inside a damp cloth to keep the humidity inside. If you leave some in the ground, they can be dug up as needed throughout the winter, provided the ground isn’t frozen solid.
Culinary Uses
Jerusalem artichokes have a mild, nutty flavor and can be used in a variety of dishes, making them a versatile addition to your kitchen.
Popular Recipes and Cooking Methods
Jerusalem artichokes can be prepared in many ways, similar to how you might use potatoes or other root vegetables. Here are a few popular methods:
- Roasted: Tossed with olive oil, salt, and herbs, roasted Jerusalem artichokes develop a crispy exterior with a creamy inside, perfect as a side dish.
- Soups: When cooked, their smooth texture makes them excellent for puréed soups, especially when combined with garlic, leeks, or carrots.
- Salads: Thinly sliced raw Jerusalem artichokes add a delightful crunch to salads, particularly when dressed with lemon or vinegar.
- Mashed or Pureed: Blend them into a creamy mash or mix with other root vegetables for a different twist on classic mashed potatoes.
Tips for Incorporating into Meals
Jerusalem artichokes can be enjoyed raw or cooked, making them easy to add to many dishes. When using them raw, slice thinly and toss into salads or slaws. Try pairing them with other earthy flavors like mushrooms, garlic, or rosemary if cooking. They’re also delicious when combined with creamy sauces or cheese in gratins.
With their nutty flavor and adaptability, Jerusalem artichokes are a unique alternative to more familiar tubers like potatoes, adding variety and depth to your meals.
Conclusion
Growing Jerusalem artichokes offer many benefits, from their hardy nature and ease of care to their versatility in the kitchen. These nutrient-rich tubers provide a rewarding harvest with minimal effort, thriving in a variety of conditions while offering delicious culinary possibilities. Whether you’re a seasoned gardener or new to home growing, Jerusalem artichokes are a great addition to any garden. We encourage you to grow them at home and discover their unique flavor and value. If you’ve had experience with Jerusalem artichokes or decide to give them a go, feel free to share your thoughts, tips, or recipes in the comments—we’d love to hear from you!
FAQs
1. What kind of soil do Jerusalem artichokes need?
-
- Jerusalem artichokes thrive in well-draining, loose soil. They are tolerant of a variety of environments, but they like sandy or loamy soils with high organic matter. Avoid waterlogged or compacted soils.
-
How often should I water Jerusalem artichokes?
- Ascertain that the soil is consistently moist but not drenched. To keep the soil from drying out, water frequently, especially during dry spells. Consistent watering is crucial for healthy tuber development.
-
When should I plant Jerusalem artichokes?
- Jerusalem artichokes should be planted in early spring after the risk of frost has subsided and the ground can be worked. They can be planted in the fall for a spring harvest in mild climates.
-
How do I know when to harvest Jerusalem artichokes?
- Harvest them in late fall after the first frost. The foliage will begin to die back, and the plants may flower, signaling that the tubers are ready. The frost sweetens the tubers, enhancing their flavor.