
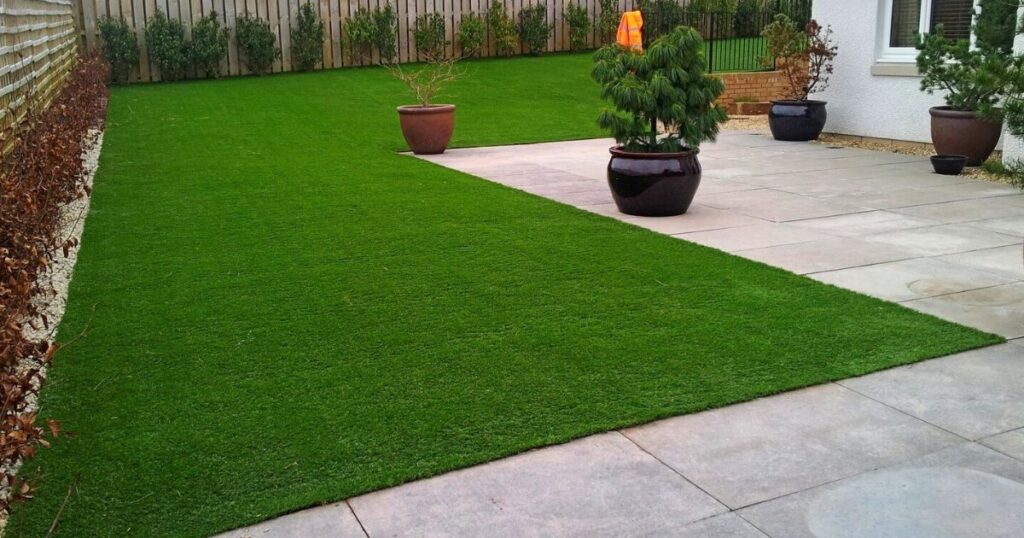
Installing turf is one of the fastest and most effective ways to transform a garden, backyard, or outdoor area into a verdant, lush sanctuary. Whether you choose natural grass or synthetic turf, a fresh lawn instantly improves the beauty, comfort, and value of your property. But there’s one big question many homeowners ask: can you install turf yourself
DIY turf installation has gained popularity due to online tutorials and the promise of cost savings. However, while installing turf yourself can be rewarding, it also requires meticulous preparation, physical labour, and some technical know-how. In this guide, we’ll explore the benefits and challenges of DIY artificial turf installation, walk you through the process, and help you decide whether it’s a project you can confidently handle on your own or one better left to the professionals.
Understanding Turf Installation
Turf installation might look simple at first glance, unroll the grass and watch your lawn transform. But in reality, it involves careful preparation, precise execution, and ongoing maintenance to ensure the lawn thrives. Understanding what turf installation entails is the first step toward deciding whether you can do it yourself or if you need professional help.
Here’s a breakdown of what turf installation involves:
What Turf Installation Means
Turf installation is the process of laying prepared grass rolls (turf) over a prepared base to create an instant lawn. Unlike seeding, turf gives an immediate green lawn that requires minimal waiting time, making it popular for homeowners who want instant results.
Types of Turf
- Natural Turf: Made of real grass grown in soil, Small Garden Design Ideas for Every Space and Budget requiring careful soil preparation, watering, and maintenance to stay healthy.
- Synthetic Turf: Made of artificial materials designed to mimic real grass, requiring less maintenance but needing correct installation for durability and realism.
Tools and Materials Needed

Installing turf yourself requires more than just turf rolls. Standard tools and materials include:
- Turf cutter or spade
- Roller or lawn roller
- Shovel and rake
- Measuring tape
- Turf soil or base material (sand, topsoil, or crushed stone)
- Weed membrane (optional but recommended)
The Importance of Proper Preparation
Proper preparation is the foundation of successful turf installation. Poor groundwork can lead to uneven growth, poor drainage, and turf deterioration. Preparation involves clearing the area, removing weeds, levelling the surface, and creating a solid foundation.
A thorough understanding of these concepts will enable you to make informed decisions about whether to hire professionals with the necessary knowledge and tools for a flawless finish or undertake the turf installation yourself.
Benefits of Installing Turf Yourself
Installing turf yourself can be a rewarding project that offers both practical and personal advantages. While it requires effort and careful planning, the benefits often make the process worthwhile, especially for homeowners who wish to reduce costs and enjoy hands-on work. Here are the key benefits of taking on a Soil and site preparation:
Cost Savings
One of the primary benefits of Weed killer and clearing debris is the savings on labour costs. Employing experts can be costly, and if you do it yourself, you will only have to pay for the turf and required supplies. This can drastically lower the project’s total cost.
Flexibility in Design and Timing
When you install turf yourself, you have complete control over the design and schedule. You can choose when to start, how to lay out the turf, and make adjustments as you go, without relying on a contractor’s timeline.
Personal Satisfaction
There’s a unique sense of pride in transforming your garden with your own hands. Installing turf yourself offers a rewarding sense of accomplishment, and seeing the instant transformation of your space can be deeply satisfying.
Complete Control Over Quality
DIY installation allows you to choose your own materials and methods, ensuring the turf meets your exact preferences for thickness, texture, and appearance. You’re in control of every step, How to Prune Roses for Healthy Growth and Beautiful Blooms from soil preparation to the final roll-out.
Learning New Skills
Taking on turf installation yourself is an excellent opportunity to learn valuable landscaping skills. These skills can come in handy for future garden projects and give you confidence to take on other DIY outdoor work.
Immediate Results
When you install turf yourself, you can achieve an instant transformation in a single day, turning a bare patch of ground into a lush, green lawn. This instant gratification is one of the most appealing aspects of turf installation.
While the benefits of DIY turf installation are significant, there are also challenges to consider, such as physical labour, technical skill requirements, and potential mistakes. The following section will discuss these challenges, enabling you to make a well-informed decision before commencing your project.
Challenges of DIY Turf Installation
While installing turf yourself can be rewarding and cost-effective, it also comes with a set of challenges that shouldn’t be underestimated. Proper turf installation requires preparation, skill, How to Grow Asparagus Ferns and physical effort. Overlooking any step can lead to poor results, wasted resources, and costly repairs. Here are the main challenges of DIY turf installation:
Physical Demands
Turf installation is labour-intensive work. You’ll need to lift heavy rolls of turf, dig, level the soil, and work outdoors for extended periods. For large lawns or uneven ground, the physical demands can be significant and tiring.
Need for Specialised Tools and Equipment
Although some basic tools, such as shovels and rakes, are standard, successful turf installation often requires specialised equipment, including turf cutters, lawn rollers, and soil compactors. Renting or buying these tools adds to costs and complexity.
Risk of Improper Ground Preparation
Ground preparation is crucial for achieving successful turf. Improper levelling, inadequate soil base, or poor drainage can result in uneven turf, poor growth, or premature decay. Without professional experience, it’s easy to overlook key preparation steps.
Time Commitment
Even for a small lawn, DIY turf installation can take several days when factoring in ground preparation, turf laying, and finishing touches. Larger projects require careful planning to avoid rushed work that compromises quality.
Weather Dependency
Turf installation is weather-sensitive. Rain, extreme heat, or drought can delay your project and affect turf health. Coordinating installations during ideal weather conditions can be challenging. 6. Potential for Mistakes.
Mistakes such as misalignment, inadequate soil preparation, or incorrect watering schedules can affect turf longevity and appearance. Professional installers often avoid these pitfalls due to experience.
Maintenance Knowledge
After installation, turf requires proper maintenance to thrive. A lack of knowledge about watering schedules, fertilisation, or weed control can undermine your efforts to maintain a healthy lawn. A professional can offer long-term maintenance advice that ensures success.
While these challenges may seem daunting, they are not insurmountable with proper preparation, thorough research, and diligent effort. The following section will guide you through the step-by-step process of Soil grading and drainage, allowing you to decide whether you want to take on the project yourself.
Step-by-Step DIY Turf Installation Process
Installing turf yourself can be a rewarding experience if done with proper planning and attention to detail. A step-by-step approach ensures your lawn looks lush, grows evenly, and lasts for years. Why Scarifying Your Lawn Can Fix Grass Problems Fast Below is a detailed guide to help you through the process.
Planning & Measuring
Before you start, measure the area where you want to lay the turf.
- To determine the total, use a measuring wheel or tape measure. Square footage.
- Add about 5–10% extra turf to account for cutting and trimming.
- Select the appropriate type of turf for your specific climate, soil type, and intended use.
Preparing the Ground
Proper preparation is the foundation for healthy turf growth.
- Clear the area: Remove existing grass, weeds, roots, stones, and debris.
- Level the ground: Use a rake to smooth uneven surfaces. For larger areas, a lawn roller or mechanical leveller can help.
- Improve Applying starter fertilizer quality by adding topsoil or compost as needed to enhance fertility and drainage.
Installing a Base Layer
A solid base supports turf growth and prevents future unevenness.
- Spread a layer of sand or crushed stone over the prepared ground.
- Level and compact the base with a roller or compactor to create a firm, even surface.
- Consider laying a weed membrane to reduce weed growth under the turf.
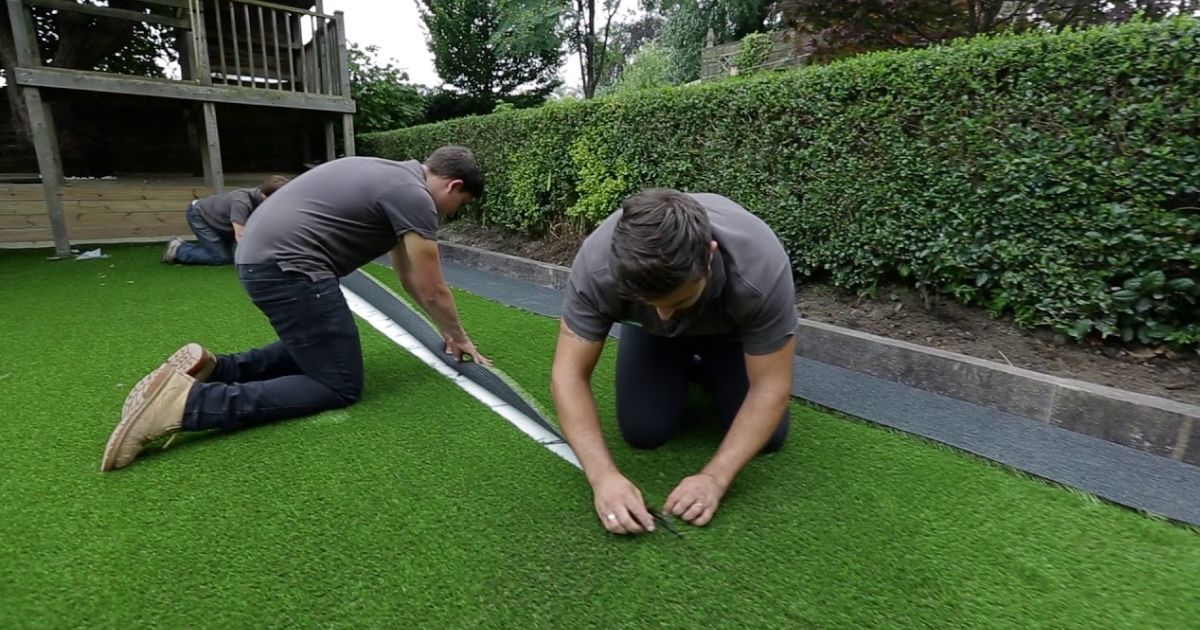
Laying the Turf
This step brings your lawn to life.
- Beginning with a straight edge, such as a walkway or fence, lay the turf.
- Place turf rolls tightly together to avoid gaps, staggering joints like bricks for strength.
- Trim the edges with a lawn cutter or a sharp knife, and fit them around curves or obstacles.
- Avoid walking on freshly laid turf to prevent damage.
Rolling and Watering
Ensure turf makes good contact with the soil.
- The turf should be firmly pressed onto the prepared base using a lawn roller. This helps roots establish quickly.
- Water the turf thoroughly immediately after laying the soil underneath, ensuring it is moist but not waterlogged.
Aftercare
Proper aftercare ensures the turf establishes successfully.
- Water daily for the first two weeks, then gradually reduce frequency while increasing depth of watering.
- Avoid heavy use until the turf is well-rooted (usually 3–4 weeks).
- Mow for the first time when the turf reaches about 5–6 cm in height, using a sharp mower blade.
- Fertilise after 4–6 weeks to encourage growth and root development.
Carefully following these guidelines can help you attain a healthy, beautiful lawn without hiring professional help. However, the process requires dedication and time, Laying and rolling turf so it’s essential to weigh the effort against the benefits before starting.
Cost Comparison: DIY vs Professional Turf Installation
Cost is one of the most important considerations for homeowners when determining whether to install turf themselves. Although do-it-yourself installation can save labour costs, Butt joints and staggered rows there are hidden costs and considerations that can impact the overall budget. Here’s a detailed comparison of DIY versus professional turf installation.
DIY Turf Installation Costs
When installing turf yourself, your costs generally include:
- Turf rolls: Prices vary depending on type and quality, usually ranging from $2 to $6 per square foot for natural turf.
- Tools and equipment: You may need to purchase or rent items such as a turf cutter, roller, spade, rake, and compactor. The cost of renting can vary from $50 to $200 per day, whereas buying equipment is more expensive but reusable.
- Soil and base materials, including sand, topsoil, compost, and weed membrane, can cost anywhere from $300 to $1,000, depending on the lawn size.
- Delivery fees: Turf suppliers often charge delivery fees, typically ranging from $50 to $200, depending on the quantity and location of turf.
Estimated Total DIY Cost: For an average 500-square-foot lawn, Cutting with sharp knife typically costs between $1,000 and $3,000, depending on the turf type, tools, and preparation work required.
Professional Turf Installation Costs
Hiring a professional installer typically involves paying for both materials and labour.
- Labour: Labour costs typically range from $2 to $4 per square foot, significantly adding to the overall price.
- Materials: Similar turf materials have similar costs, but suppliers used by professionals may offer better bulk prices.
- Additional services: Professionals include ground preparation, levelling, and debris disposal in their package, which can save you time and ensure quality.
Estimated Total Professional Cost: For a 500-square-foot lawn, professional turf installation generally ranges from $2,000 to $5,000.
Hidden Costs to Consider
DIY turf installation can involve unexpected expenses:
- Renting equipment for longer than planned.
- Purchasing additional turf due to measurement errors.
- Re-doing work if preparation wasn’t done properly.
- Professional installation avoids many of these risks but comes at a higher upfront cost.
Time vs. Money
- DIY installation saves labour costs but takes more of your time and effort.
- Professional installation costs more but saves time and often delivers a more polished, long-lasting result.
When to Consider Professional Installation
While DIY turf installation can be rewarding and cost-effective for some homeowners, there are situations where hiring a professional is the wiser choice. Professional turf installers bring experience, specialised tools, and expertise that ensure a flawless, long-lasting lawn.Consider professional installation for large or complex areas. Large lawns require significant physical effort, precise measurement, and careful preparation, all of which professionals handle efficiently. Uneven terrain, poor soil conditions, or areas with heavy foot traffic also benefit from expert installation, Using galvanized nails or staples as professionals can level the ground, improve drainage, and select the right turf type for durability.
Complex landscaping designs, such as curved edges, intricate patterns, or integration with patios, paths, or irrigation systems, require precision that professionals can deliver. For property owners who value time savings, hiring experts is also beneficial, as they can complete the job more efficiently and with fewer errors.If your schedule doesn’t allow for extensive DIY work, or if you want a high-quality finish without the risk of errors, professional turf installation is the best route. In the long run, investing in expert installation often saves money by reducing maintenance needs and ensuring your lawn thrives for years to come.
Maintenance After Installation
Proper maintenance after installing turf is essential to ensure your lawn establishes well and remains healthy for years. Whether you install turf yourself or hire professionals, following the proper care routine during the first few weeks is critical for root development and long-term durability.
Watering
- Watering is the most important part of turf care after installation.
- To maintain soil moisture and promote deep root development, Gluing seams with adhesive irrigate the lawn every day for the first two weeks.
- In the morning or late at night, sip water to reduce
- Gradually reduce frequency after the initial period while increasing watering depth to encourage deeper roots.
Mowing
- Wait until the turf reaches about 5–6 cm in height before the first mow.
- To avoid damaging grass blades, choose a sharp mower blade.
- To avoid stressing the grass, refrain from trimming more than one-third of its height at once.
Fertilising
- Fertilise your turf approximately 4–6 weeks after installation with a balanced lawn fertiliser to promote healthy growth and root development.
Weed Control
- Inspect regularly for weeds and remove them promptly.
- Use a turf-safe weed killer if necessary, How to Grow Tulips following the manufacturer’s instructions carefully.
Ongoing Care

- Aerate the lawn once or twice a year to improve soil health.
- Maintain proper watering and feeding schedules based on turf type and climate.
By following a consistent maintenance routine, your turf will grow strong, lush, and beautiful, giving you the instant lawn you envisioned.
Conclusion
Installing turf can dramatically transform your outdoor space, creating a lush, green lawn that adds beauty, comfort, and value to your home. While DIY turf installation offers cost savings, flexibility, and personal satisfaction, it also requires careful planning, physical effort, and a clear understanding of the process. Challenges such as ground preparation, tool requirements, and time commitment mean it’s not always the best option for every homeowner.For smaller areas, simple designs, and those who enjoy hands-on projects, installing turf yourself can be a rewarding and budget-friendly choice. However, for larger lawns, uneven ground, complex landscaping, or when time is limited, hiring a professional ensures a high-quality, durable finish with fewer risks.
Ultimately, the choice is determined by the scale, your skill level, and your project budget. With proper preparation and ongoing maintenance, whether DIY or professionally installed, turf can offer a beautiful, long-lasting lawn that enhances your outdoor living experience. Choosing the right approach ensures your turf installation is successful, bringing your vision of the perfect lawn to life.
FAQ
How long does it take to install turf yourself?
For an average-sized lawn (about 500 sq ft), DIY turf installation typically takes 2–4 days, including ground preparation, turf laying, and finishing touches. Larger areas may take longer.
What tools are needed for a DIY turf installation?
Essential tools include a turf cutter or spade, a rake, a measuring tape, a lawn roller, and a sharp trimming knife. You may also need soil, sand, and a compactor for proper preparation.
What is the cost of DIY turf installation?
DIY turf installation costs vary depending on the type of turf, tools, and the size of the lawn. For a 500 sq ft lawn, fees typically range between $1,000 and $3,000, excluding tools you may already own.
Can I install turf on uneven ground myself?
While it’s possible, uneven ground requires more preparation, including levelling and soil amendment. For large or heavily uneven areas, professional installation may ensure better results.
How do I ensure my turf lasts long?
Proper maintenance is key. Water deeply but infrequently after establishment. Mow regularly, avoiding cuts that are too short. Fertilise seasonally, control weeds, and aerate annually.